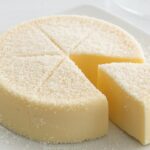
No-Flour Milk and Coconut Cake
This easy No-Flour Milk and Coconut Cake is a simple and delicious way to use up ingredients you already have in your kitchen. Whether you're a beginner or a seasoned cook, you'll love how quick and effortless this recipe is. Plus, it’s gluten-free and doesn’t require an oven—perfect for those hot summer days when you want a sweet treat without the heat!
Equipment
- Mixing bowl
- Saucepan
- Whisk or spatula
- 15cm (6-inch) diameter round or square container
- Cooking oil for greasing
- Plastic wrap
Ingredients
- 2.5 cups Milk 600g
- 4 tablespoons Sugar 50g
- 0.5 cup Corn Starch 60g
- 2 slices Cheese Slices
- Coconut or Milk Powder optional For garnish
Instructions
Prepare the Mixture
- In a medium-sized mixing bowl, combine 600 grams (about 2.5 cups) of milk, 50 grams (4 tablespoons) of sugar, and 60 grams (0.5 cup) of corn starch.
- Whisk the ingredients together thoroughly to ensure the sugar and cornstarch dissolve evenly, forming a smooth and lump-free mixture.
Heat the Mixture
- Add 2 slices of cheese into the mixture.
- Pour the mixture into a saucepan and heat on low.
- Stir constantly to prevent lumps and ensure that the mixture heats evenly. This step is crucial for a smooth consistency.
Cook Until Thickened
- Continue stirring until the mixture thickens to a pudding-like consistency. This may take a few minutes, so be patient.
- Once the mixture is thick enough to coat the back of a spoon, turn off the heat.
Prepare the Mold
- Grab a 15 cm (6-inch) round or square container. You can use any shape, but ensure the size is appropriate.
- Brush a layer of cooking oil inside the container to prevent the batter from sticking.
Pour and Smooth
- Pour the thickened mixture into the prepared container.
- Use a spatula to smooth the top, making sure it’s even.
Chill and Set
- Cover the surface of the batter with plastic wrap, pressing it gently against the surface to avoid a skin forming.
- Refrigerate for at least 4 hours, or preferably overnight, to let the cake set and develop its flavors.
Serve and Enjoy
- Once set, remove the cake from the fridge and turn it upside down onto a serving plate. The smooth surface will be as glossy as a shelled egg!
- You can enjoy the cake as is, or for added flavor and texture, sprinkle coconut or milk powder on top.
Video
Notes
Tips for the Best Results:
- Low heat: Keep the heat low while cooking to prevent burning or clumping. Slow and steady wins the race here!
- Smooth top: Use a spatula to smooth out the batter as much as possible before chilling. This helps to create that beautiful, glossy finish.
- Overnight chilling: If you can, chill the cake overnight to get the perfect firmness and flavor.
Nutrition Facts (Per Serving)
- Servings: 4-6
- Calories: 180
- Fat: 6g
- Carbohydrates: 25g
- Protein: 6g
- Sugar: 10g